Showing posts with label craft ideas. Show all posts

5.22.2012

Jar Love #47: Homemade Sugar Scrub for Mothers' Day Gifts


When I was looking for Mothers' Day gift ideas a couple of weeks ago, my love of jars may or may not have influenced my search results.

Homemade sugar scrub...? In canning jars...??

Yes. Please. And thank you!

The truth: I know knew very little about what exactly one does with sugar scrub. (Do you eat it or wash walls with it?) But after a bit of research I discovered sugar scrub (and even more so HOMEMADE sugar scrub) is all the rage for those poor, cracked, scaly, summer-ravaged feet and hands out there. It claims to exfoliate and rejuvinate even the most abused skin. Ahhh! And I've been suffering in silence all this time.

So I figured I would give it a go. I found a recipe for homemade lemon sugar scrub. Now to find all the "gourmet" ingredients...

Sugar. As in regular, plain, old, ordinary, baking, table, cereal sugar. Check.
EVOO. Extra virgin olive oil. Check.
Lemon juice. Bottled. Check.
Essential oils. Screeeech!

After a tad more research I discovered essential oils can be obtained at your local natural/health food store. One quick "Kids! To the van!" later...I had some essential oils in my hot little hand. Lavender. Mmmm.

Back home and about 2.41 minutes later I had my own resealable jar full of homemade lemon sugar scrub. Fresh, fragrant, and fully capable of exfoliating all that yucky skin off my hands and feet. I tried it out on my scaly legs too and it worked beautifully! Smooth, satiny, and rejuvinated with lemon and lavender!

Side note: Someone mentioned that sugar scrub was good to shave with. I don't know if I was doing something wrong or if I'm just a wimp, but after one swipe with the razor...I have come to the conclusion that you should indeed NOT shave with sugar scrub. OUCH!

Armpit note: Scrub is not to be used on your face either. Facial skin is much too delicate.

After making my own jar of scrub I was hooked. The world must know of the goodness of homemade sugar scrub! I went on to make a couple of quadrupled batches in my big popcorn bowl. My childen kept begging for a taste as I giddily stirred my sugar, EVOO, lemon juice, and essential oils concoctions.

25 eight ounce canning jars later...


...I had Mothers' Day gifts for the moms of the primary children of our ward, thank yous for Teacher Appreciation Week, and more Mothers' Day gifts for our own moms, grandmas, and friends.

The beauty of homemade sugar scrub (besides the obvious eye appeal of it sitting on the counter in a clear canning jar) is how easy it is to make, adjust, and personalize. Don't like lemon or lavender? No problem! Try peppermint instead. Or vanilla. Or use brown sugar instead of white. Or switch out the EVOO for grapeseed oil. You really can't go wrong with this. There are tons of free recipes online for homemade sugar scrubs.

Once you have your jars filled, decorate and personalize your containers to your heart's desire. Again, if you're feeling creatively flat, go online for lots of decorating ideas. For my jars, I used a big circle paper punch to cut out circles of lemony yellow scrapbook paper. I applied it to the jar front and lid top with Modge Podge.


I figured there might be other people out there who are as clueless as I was about sugar scrubs so I added a label as well as a tag with the scrub ingredients, an explanation of what it was, how much to use, and to make sure to stir it up before each use.


I also wrote and attached a little poem to the Mothers' Day jars. I just couldn't let a good pun opportunity pass me by.


Recipe for Homemade Lemon Sugar Scrub (makes 12 oz with a bit to spare):
2.5 cups sugar
1 cup EVOO
4 TBSP lemon juice
several drops of essential oil

Combine ingredients in bowl. Mix thoroughly into a gritty paste. Pour into desired container. Seal tightly. Oil will separate as it sits; make sure to stir again before each use.

I know I'm a little late for Mothers' Day now, but this would make a great baby shower favor, an addition to a new mother basket, a thank you for the church ladies, or a "just because I was thinking of you" treat. And don't leave yourself out! Whip up a batch and spoil your own hands once in awhile. Especially after you've covered them in gardening grime, pasty paint, or crafting crud.

1.14.2012

A SUPER Super Mario Bros. Birthday Party - Let's A-GO!

Last fall, right around the time school started, two men entered my son's life...


For a six year old boy this was a life altering event. In fact, I am considering cataloguing all his pictures and memories with "B.M." and "A.M." (Before Mario and After Mario). I have hope that there will be an After After Mario, but for now I'm not holding my breath.

The kid is 100% obsessed.

Everything is/will be/should be/has to be Mario.

Clothes. Bedding. Toys. TV shows. Imaginary play. Conversations. Dreams. Halloween costumes. Food. Christmas ornaments.

You name it. The boy at least wishes it was Mario.

As his mother...I HATE IT. I was raised in a home where Nintendo and other video game systems were considered a "waste of time; time better spent doing something to enrich or educate your mind and body". That was my take as a new parent too.

But I also remember what it was like being a kid and wanting to be involved in what all your friends were into. In this day and age, first grade boys LOVE Mario and Luigi. As superficial as it seems, much of my boy's friendships seem to be based on all things Mario.

So it was no surprise that this year, as Dee's birthday came closer, he had two requests: 1- "Can I PLEASE have a birthday party with my friends?" and 2- "MARIO!"

As the years go by and my parenting style adapts I am working to do some things the way my children want versus the way I want. If it were up to my we would avoid the mainstream and pop culture when it comes to things like bedding, toys, clothes, and birthday parties. But it's not up to me. It's Dee's birthday party. It's his choice. So...*sigh*...Mario...it is. (This isn't to say my children get everything they want. But it's time for me to let go of some of the control and let them form their own personalities and tastes.)

Confession: I complained to begin with. I may have even tried a bit of coaxing and bribing to not have a Mario party. But after I let go and let live the brain juices started flowing. A Super Mario party would never have been my first choice, but it was so much fun to plan and prepare for!

**Note: After cruising around on the Internet I figured out that none of my ideas are wholly original. There are a lot of fun, creative moms out there. This is just my take on a Super Mario party. And many of those moms are doing the same thing so I'm not referencing any of this.

I hit up my local party store for Mario themed invitations.


Just a little mom-to-mom helpful hint here: This was our very first friend party. Dee wanted to invite a few boys from his school class. Since we didn't have all their addresses he took the invites to school and handed them out as class was ending. This was a horrible mistake. I happened to be there that day and watched--along with the other classmates--as only a select few got the invites. I would have loved to invite them all, but this was just not possible. It was heart wrenching and I could see we had gone about this all wrong. I talked to Dee's teacher about it afterwards and she advised the best method was for the child to come early to school and pass them out before class starts. That way the kids are still pretty distracted and not as many are getting their feelings hurt. Now I know what to do next time.

Dee requested a pinata for his party so the week before I worked on making a Yoshi egg pinata. Somehow I find myself making pinatas a couple of times a year. Store pinatas are really expensive! You can make your own for pennies on the dollar. While it can be messy and kind of a long process, it's really simple and a lot of fun. (I posted a how-to back in 2010.)

I filled the pinata with candy and some plastic coins I also found at the party store (400 count for $9.99).


Cracking the pinata open was one of three games we played at the party. For another game I decorated Easter eggs (I just pulled them out of storage) with white dots to look like more Yoshi eggs. I used plain white computer paper and a circle punch I have. While I watched Leno one night I punched holes and taped three on each egg. Then I filled the eggs with various numbers of coins. For this game we hid them around the house (it's too cold to go outside) and the kids ran around finding as many eggs as they could, putting them into brightly colored paper bags with their names markered on.

The third game was a balloon game. I bought green, brown, black, and white balloons to represent the turtles, goombas, chain chomps, and ghosts (respectively). Before blowing them up I stretched them open and dropped in various amounts of plastic coins.


I honestly wasn't sure what I was going to do with the balloons. In my head I imagined the boys going through some kind of obstacle course to pop the balloons with their feet or bums. But on the day of the party it just wasn't going to work. There wasn't enough room with all the people in the house. My brother in law took over and taped them all on the wall in rows, drawing questions marks on them. The boys took turns throwing darts at them and collecting the coins after each turn. It worked perfectly! (Thanks Kip!)

At the end of the three games we helped the kids count their coins. First place got to pick one of two plush Mario figures I had purchased and used as table decorations. Second place got the remaining figure and third got a tiny little pair of plastic Mario and Luigi figurines that were left over from the cake decorations.


Speaking of the cake... I HATE decorating cakes! I always have the greatest ideas, but my cake skills are sadly lacking and by the time I'm done, the cake looks NOTHING like what I had envisioned. The entire process stresses me out way more than is healthy. Seriously. As I started on the decorating Saturday morning it wasn't long before my husband quietly collected up all the children and herded them out the door for awhile so Mommy could freak out all by herself. Note to self: Next year, avoid spontaneous combustion and leave the cake baking and decorating to the professionals.

However much hair got pulled out, the cake finally did get finished and while it once again isn't what I had envisioned, it's acceptable.

Before Christmas I ordered a LOT (as in a collection) of 18 Mario figurines off of Amazon.com so I could make Dee's Christmas ornament (I like to make my family's ornaments based on what they were doing or into that year. Obvious choice for Dee: Mario) and then have some left over for his cake. They were the perfect size on the cake. I also purchased some star candles which posed as the Star Power.

After Dee blew out the candles he had the choice to keep all the figurines for himself or hand them out to all the kids who were begging for them. What a good boy; he shared with his sisters, cousins, and friends. Those figurines were a hit! The kids were running around playing with them for a good hour after the games and cake were done.

Along with cake we served some of Dee's favorite treats. A birthday tradition we seem to be making is taking the kids to Winco which has an AWESOME bulk foods section including tons of candy. The birthday kid gets to pick a few of his favorites and we serve them at the party.We don't eat a lot of sugar most of the time so when birthdays roll around I say it's fair game.

When it came to plates, silverware, and cups I just couldn't justify spending as much as the party store wanted for Mario themed paper goods. Instead I purchased brightly colored plates (red, green, and blue), white napkins, and red plastic cups and called it good. I also purchased two bright blue table clothes from the dollar store. It was lovely to be able to just gather up the table cloth and throw the mess away when the party was over. Definitely worth $2.

We decorated the house with brightly colored balloons, streamer, and a pendant banner, all of which I purchased at the Dollar Store. I did splurge on some Mario themed stickers at the party store. I'm a little embarrassed to tell you how much I spent on them so I won't, but Dee really appreciated them and doubly so as they are now reused as wall decor for his room.


Before the party I cut several moustaches out of black felt (one sheet of felt at Walmart for $0.20) and gave them to each of the boys as they came in the house. I tried several ways to attach them to their faces, but found tape to be the most effective. Even then they didn't last long, but it was more about the novelty than anything.


As the boys left they received a little clear bag which contained Mario stickers, a note pad, and a little black bouncy ball that resembled the chain chomp balls from the game. If I had had more time I would have added a little tag that said something like: "GAME OVER. Wii thank you for coming to celebrate Dee's Super party!". Little boys could care less about stuff like that, but I thought it was cute and it still bugs me that I didn't have enough time to do it.

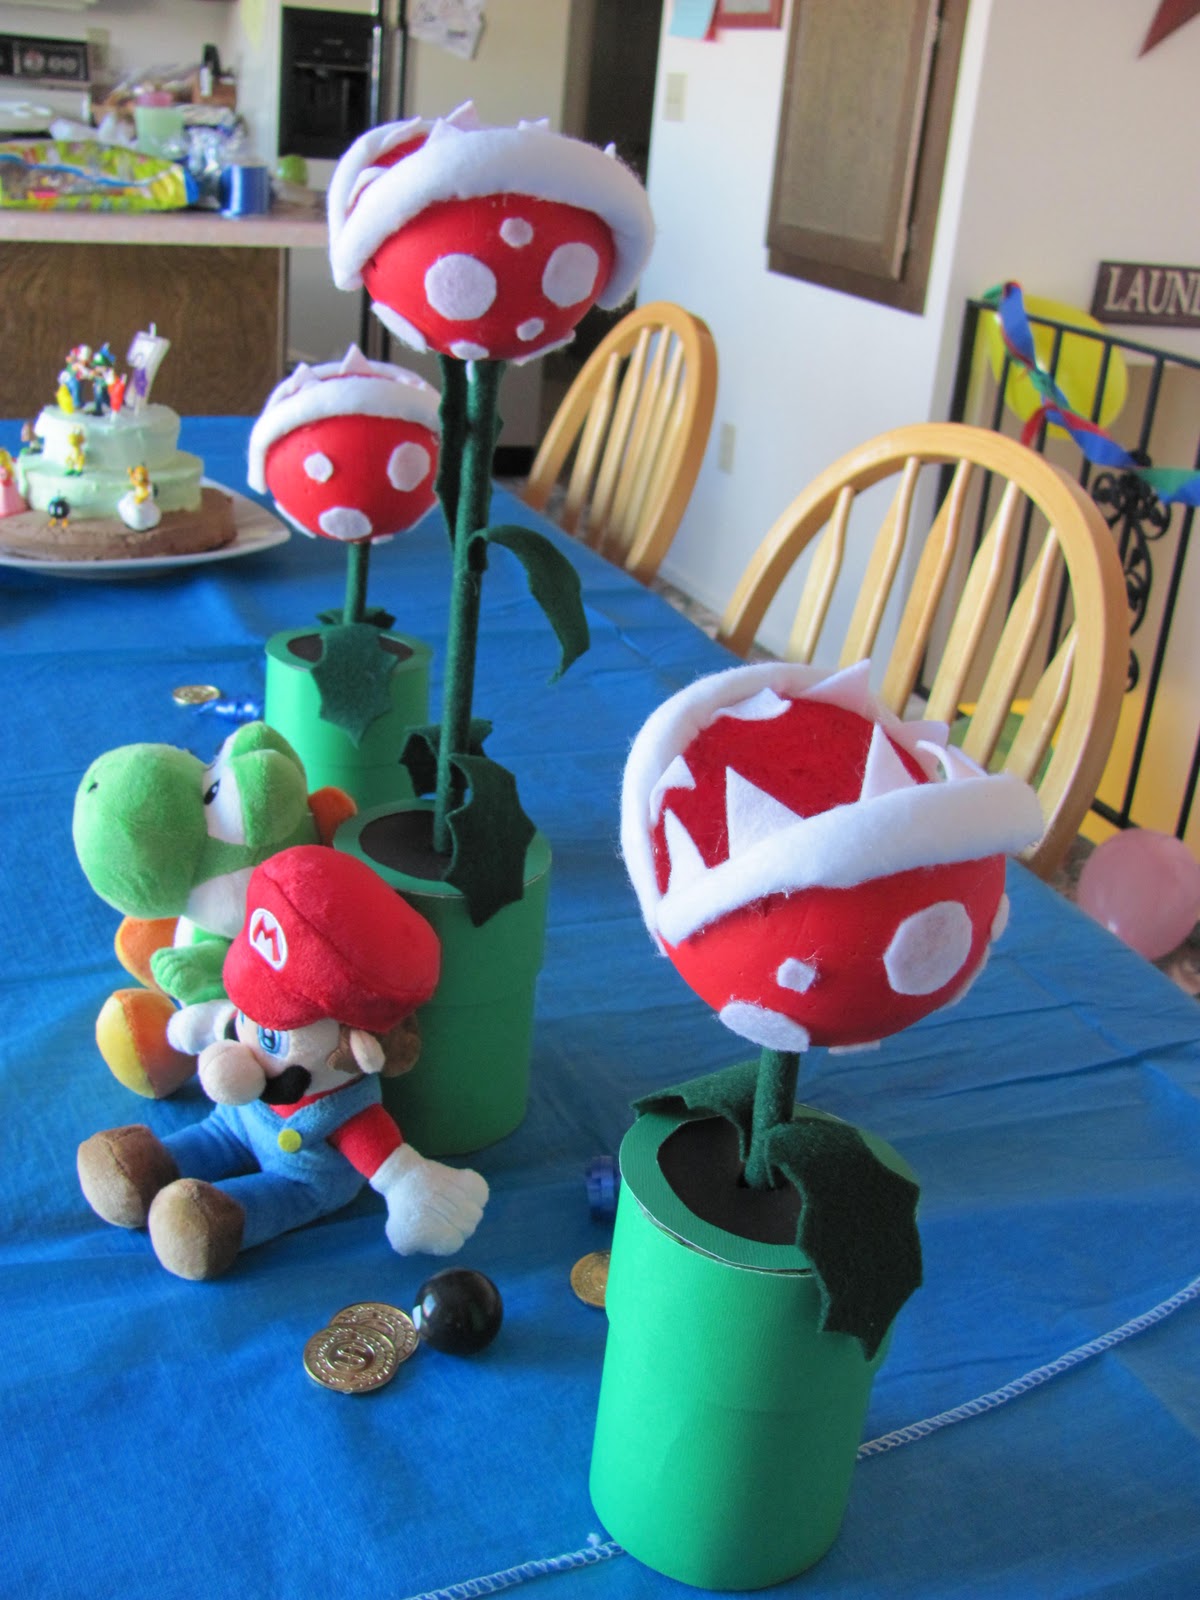
I realize this post has gotten irrationally long so I'll share a tutorial on my personal favorite part of the whole party... le pièce de résistance...The Piranha Plant Table Centerpieces! another day.

Until then...
Happy Super Birthday to my super little plumber who I think had a most excellent time at his Super Mario birthday party!

1.12.2012

Super Mario Birthday Party Preview

Dee's seventh birthday is tomorrow and the big party is Saturday. I'm up to my elbows in projects. No time for "real" blogging. So here's a little preview of the Super goodness to come:

I give you...The Table Centerpieces
(because 6 little first grade boys really care about stuff like that...)


Fess up.

Right now you're wishing you were seven years old.

That you're a boy.

That it's your birthday tomorrow.

And that I was your mom.


Let's a-go.

P.S. Tutorial anyone?

10.28.2011

Easy Halloween Decorations: Pass the Popsicle Sticks Please!

Halloween is riiiiight around the corner. So what if I just barely got my Halloween decorations up this week? At least they are up! 

One little treasure I found in the bottom of my Halloween decoration box was these cute little ornaments the kids and I made last year. My children felt that my collection of Halloween decorations was sorely lacking and wanted to supplement with something homemade. I had a ton of Popsicle sticks sitting in my craft drawers. With the help of my trusty glue gun and some paint we had some new Halloween decorations in no time. Very easy, a little messy when the kids got involved, but loads of festive fun for everybody.
We made pumpkins and Frankensteins. The Frankies were my favorite so that's the one I'll show the tutorial for. You could probably figure out how to make these simply from looking at the finished result, but for those who are craft-challenged like me, here's the how-to:


Arrange about 6-8 Popsicle sticks *** in a row. Don't worry too much about everything being nice and neat and even. The fun of Halloween is that "messy accidents" look "spooky" and "intentional".

Hot glue one stick across the row of sticks to secure everything in place. Make sure to leave some of the stick out on both sides of the row of sticks. This will serve as Frankie's bolts.

Flip the whole thing over so that the one glued on stick is in back.

Paint and let dry.

When dry paint the bolts black and paint on hair. Let dry.

Go crazy decorating Frankie however you want. I used my paintbrush to flick black paint over the entire face.

I cut out yellow paper circles for the eyes and glued them on. I also glued on black pony beads. A black sharpie marker worked perfectly for the mouth. My kids used the marker and other beads to add facial features.

A layer of Modge Podge sealed the deal nicely. I also hot glued some string on the back so that Frankie could be easily displayed. Right now all our Frankies and pumpkins are hanging on our dining room curtain rods with the help of some fishing line.

The pumpkins are just as simple to make with a few variations. I used more sticks (11 to be exact) in the row of sticks and glued on two sticks in the back in different spots to make the decoration more secure.


We used black paper and wood triangles for the eyes, nose, and mouth. I had some spare fake greenery that we glued on for the pumpkin stems and leaves.

Simple and cute. Just the way I like all my crafts.

Happy Halloween everybody!

***Unless you happened to save all those sticky Popsicle sticks from summertime you can find Popsicle sticks for sale at any craft store or Walmart's craft area.

5.02.2011

Note to Self: Halloween 2011

This is what the kids decided they wanted to be for Halloween...as of May 1st.


Dee.....Papa Bear
Jeigh.....Mama Bear
Elle.....Goldilocks (of course!)
Cee.....Baby Bear

Say it with me now: "Aaaaaaahhhhhhhhhhh!"

List of things for the real Mama Bear to do:

1. Remember this idea for the next six months.
2. Learn how to sew before October.
3. Keep an eye out for stray bears or at least bear costumes.
4. Make sure Elle's locks stay "goldy".

4.14.2011

It's a Sickness I Tell You

Remember how I told you the other day in my vlog that I am a "picture frame fiend"?


I wasn't lying.

Or even exaggerating.

For the past several years we have been renting temporary places of residence. It's hard to want to nail a picture on a wall when you know you aren't going to be sticking around for long.

Plus, there just hasn't been any room. So all my pretty pretty frames and decorating items have been biding their time in dusty boxes in storage...

...Until we moved here and my family helped us unpack and settle in our new spacious home.

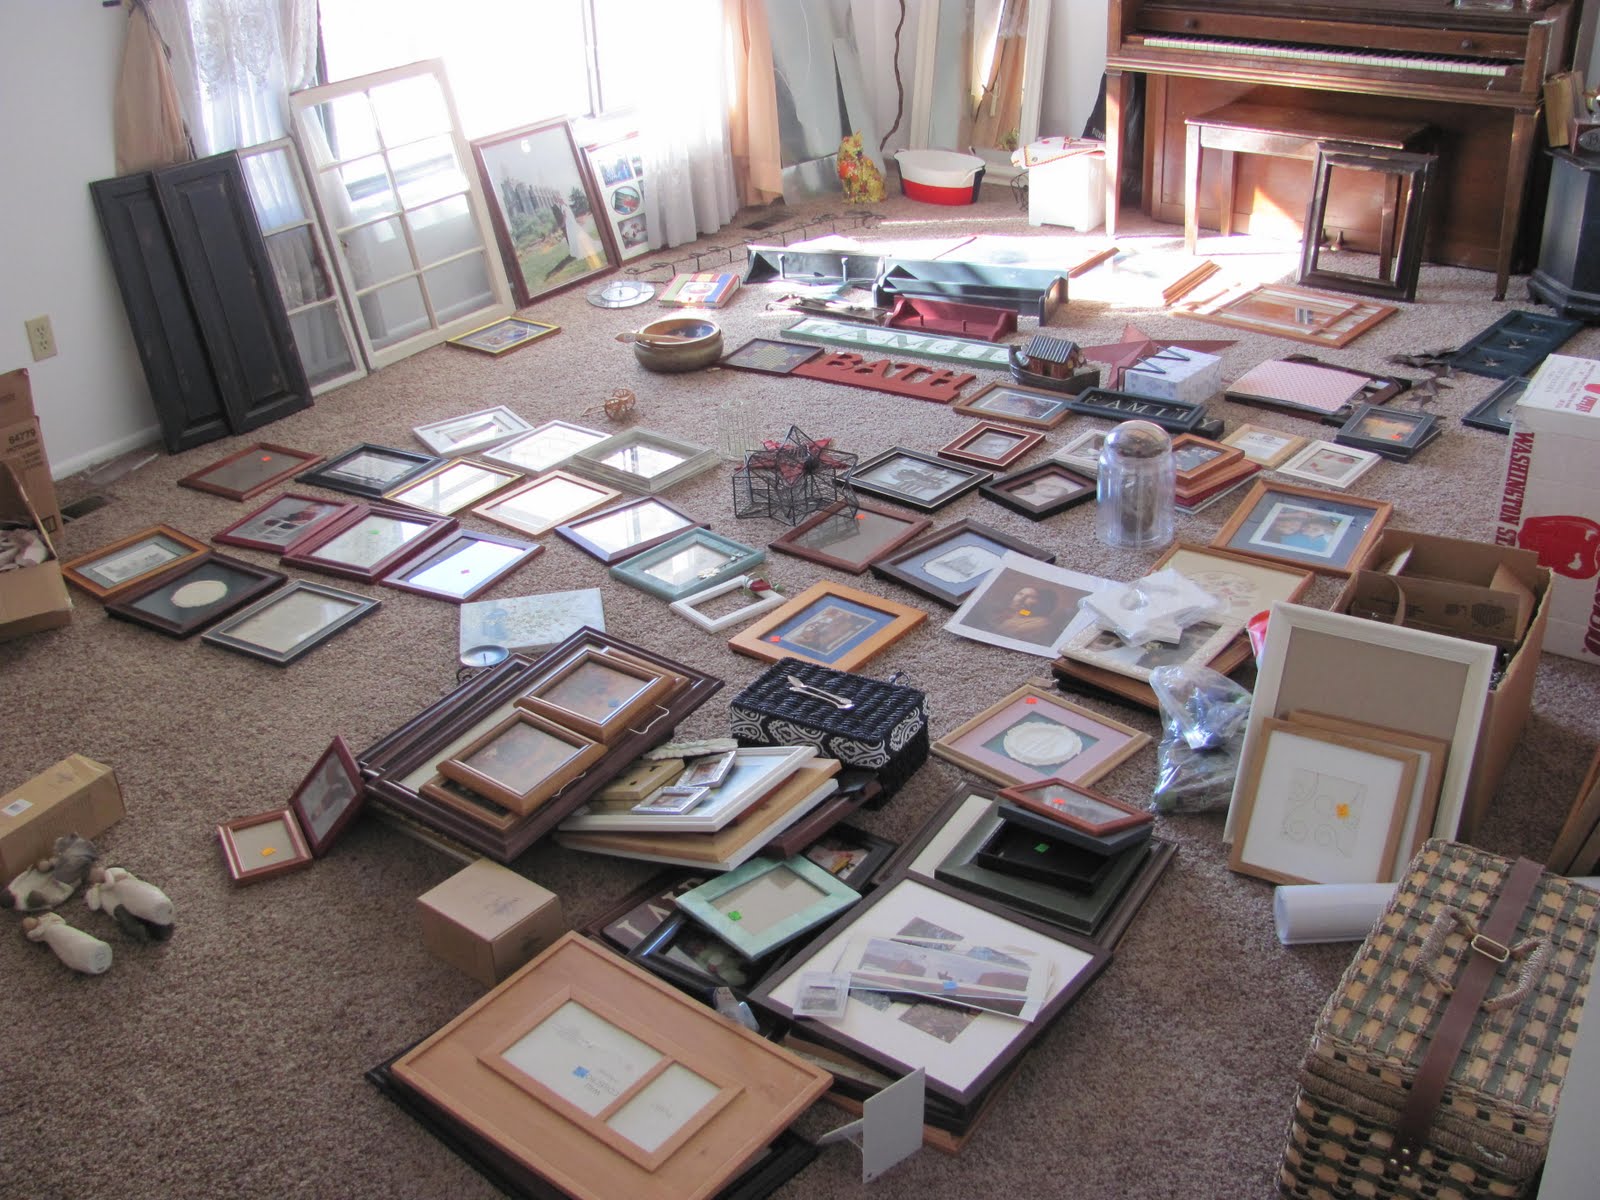
While I sat and held my week old newborn, my sisters, sister-in-law, and mom unpacked box after box of frames, stars, Americana, shelves, and assorted decorating paraphernalia that I have been hoarding collecting over the last almost eight years of marriage and moving.

They laid all of it out in that front room I was showing you the other day on the vlog and then called me in for an intervention.

Let me tell you...those pictures do no justice.

I may need a testimonial from my sister Camille. She'll tell you how bad it was/is. She was more than willing to tell me I had a problem that day. (In a loving, humorous, sisterly way of course.) And I began to wonder if I did when I saw it all laid out in one place.

It looked like an episode of Hoarders.

I almost started crying. Out of happiness at seeing all my pretty things again. Out of shock that I could possibly be one of those crazy people who collects stuff simply for the sake of collecting stuff.

My story is on its way to a happy ending.

I have not allowed myself buy a single frame since being faced with my frenzy of frames. I even went through the ones I already have and purged some of the less desirable.

I am on the road to recovery.

Now to get all the ones I have sitting in boxes in the corner up on that big white wall. (I keep saying I am going to wait until we get it painted, but I think my self-dictated therapy may require a sooner-rather-than-later approach.)

This episode of Hoarders is ready for HGTV.

12.02.2010

AFTER the Happily Ever After (A Recipe)


Once upon a time...

There was an incredibly beautiful young girl named Evelyn Cinderella or Snow White or Esmerelda or something fluffy like that. She was very kind and oh-so-generous and super duper talented, not to mention one crazy cleaning machine. She was very blessed but this girl yearned for more.

She wanted a fairy tale ending. A fairy tale that came complete with one handsome prince and one comfortable cottage (she was willing to wait for the castle to come) that would be absolutely brimming full of babies.

And guess what? Our fair maiden got exactly what she asked for: a fairy tale ending.

Only problem is she didn't realize "ending" really meant "beginning".

Who knew there was a big fat AFTER to the Happily Ever After?

Some days that "after" part can get a little intense and our fair maiden tries to remember exactly what she had in mind for herself those many years ago. She felt quite certain she had been destined to be a skinny, saucy, stellar housekeeper, wife, and mother.

Hmm...About that...

Like any good story, you can trust that our maiden/heroine will continue to persevere and reach for her fairy tale ENDING.

But some days, she likes to just sit in her cluttered, chaotic cottage and reminisce about those good ol' days of romance and peace and quiet and pumpkin carriages. And on those days she says, "Ahhh, forget it! Let's eat cake!"


All the credit for this idea goes to Mormon Mommy Blogs, but I just had to give it a try. Look how fun it is! And who cares if Thanksgiving is over?

For this recipe/craft/centerpiece you will need:

-2 cake mixes (pick your favorite flavor!)
-supplies to make cake mixes (eggs, water, oil)
-2 bundt pans
-frosting (you could make your own or buy the pre-made stuff)
-food coloring
-an ice cream cone
-cake plate


Mix up both cake mixes. Let your minions peasants crowned jewels in on the fun!


Pour one cake mix batter in each bundt pan and bake according to box directions.


Allow cakes to cool completely before decorating. Mix up some orange frosting.


Cut the tops (or are those the bottoms?) off of each bundt cake making sure they are level.


Smear some frosting on one cake to create a "glue".


Stack and match up cakes.


Carefully spread frosting over entire pumpkin cake. (In hindsight I may not have used such a dark cake mix that can "peek through" and I would have tried to make my frosting a much more brilliant orange.)


Place cake on a decorative cake plate. I don't have a cake plate so I just used an upside down decorative leaf plate. Prop an ice cream cone in the center as the stem. I dampened the ice cream cone and sprinkled green crystal sprinkles on it. I added some fake green leaves I had from another project.

...And they ate happily ever after!

LinkWithin

Related Posts with Thumbnails